How to install and configure the VPN client
In this guide, it will be shown how to install and configure the VPN connection to access resources on Cloud@ReCas having private IP.
If your VM has a private IP (recommended option), you have to first launch a client (FortiClient) enabling the VPN connection, and then you can access it.
To set the VPN connection you have to install and configure FortiClient.
This guide shows how to do it in different OS:
Windows
- Installation
- Download the client from http://www.forticlient.com/.
- Run the downloaded file FortiClientOnlineInstaller.exe and follow the instructions. Notice that installing only the VPN is enough for our purpose.
- Configuration
- After running FortiClient, select
Configure VPNinRemote Access. - In the new window, configure the session as follows:
- in Connection Name, choose a name for your VPN (for ex., recas-private-net);
- in Remote Gateway, type 212.189.202.2 ;
- in Customize port, type 8443;
- finally, Apply settings and Close.

- After running FortiClient, select
- Starting
Once the VPN is configured, select the connection you have created, type your username and password, and click
Connectto start it. When asked, accept the certificate.
Mac OS X
- Installation
- Download the client from this link.
- Double click the downloaded file FortiClientOnlineInstaller.dmg and then the file FortiClientUpdate.
- Follow the instructions to install the client.
- When asked, accept the certificate.
- Configuration
- After running FortiClient, select
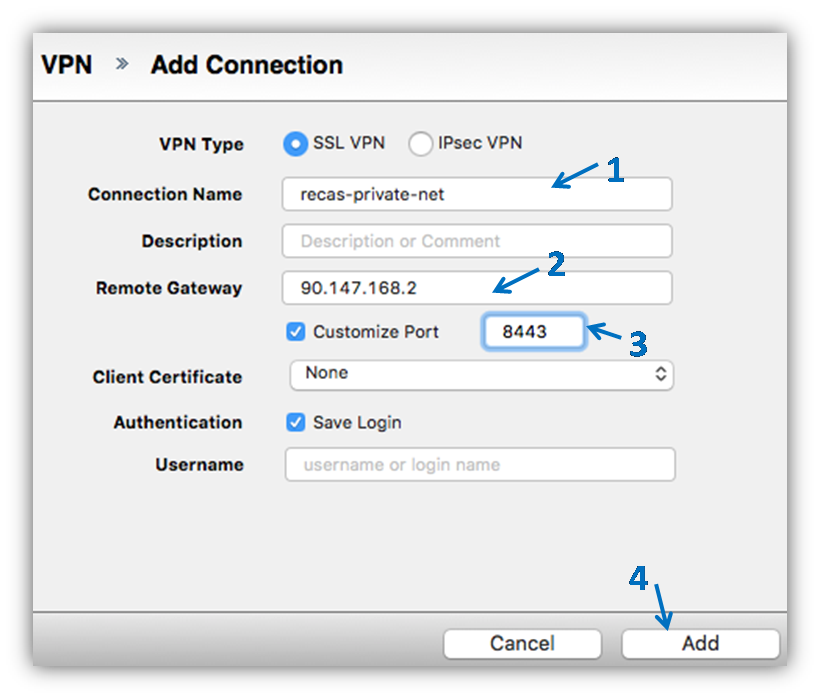
Remote Access, and select add a new connection from the menu. - In the new window, configure the session as follows:
- in Connection Name, choose a name for your VPN;
- in Remote Gateway, type 212.189.202.2 ;
- in Customize port, type 8443;
- finally, Add the configured connection.

- After running FortiClient, select
- Starting
In
Remote Access, select the VPN you created, type your username and password andConnect.
Linux
- Installation
Choose the right option depending on your Ubuntu version: in Ubuntu 14.04 or higher go here, in Ubuntu 12.04 go here.- Ubuntu 14.04 or higher (this procedure is not suitable for Ubuntu 12.04)
- Download the .deb from this link (64 bit) or this link (32 bit);
- open the downloaded file (double click) and follow the instructions;
- to open FortiClient SSLVPN, use the icon on your pc. Accept the license conditions, then the window FortiClient SSLVPN will appear.
- Ubuntu 12.04
- Download the tar.gz from this link;
- untar the zipped folder with the command
tar xvf forticlient.tar.gz
and run the file forticlientsslvpn in the forticlientsslvpn folder:cd forticlientsslvpn ./forticlientsslvpn
- if "No such file or directory" error occurs, install:
sudo apt-get install ia32-libs-gtk
sudo apt-get install libgtk2.0-0:i386
- accept the license conditions, then the window FortiClient SSLVPN will appear.
- Ubuntu 14.04 or higher (this procedure is not suitable for Ubuntu 12.04)
- Configuration
- After running FortiClient, in the FortiClient SSLVPN window, select
Settingsto add a new VPN. - In the new window, select Keep connection alive untill manually stopped and add a new VPN.
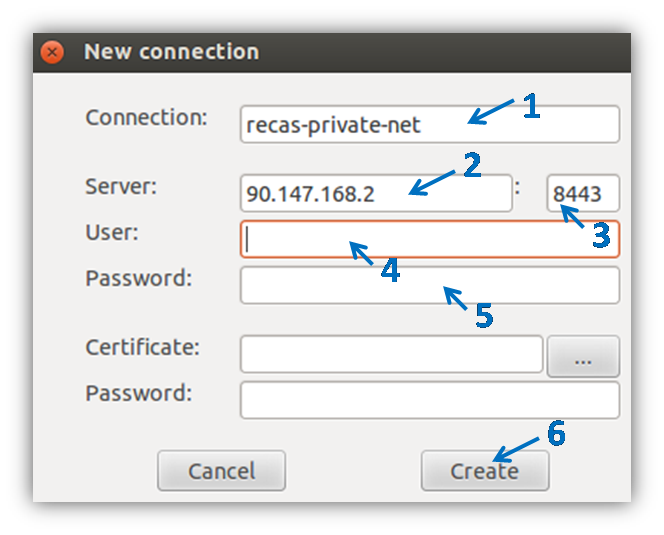
- In the new window, configure the VPN:
- in Connection, choose a name for your VPN;
- in Server, type 212.189.202.2 ;
- after ":", type 8443;
- in User, type your username;
- in Password, type your password;
- finally, Create the connection.

- After running FortiClient, in the FortiClient SSLVPN window, select
- Starting
Select the VPN connection you created, and
Connect.